![]()
Don’t forget teacher appreciation week is NEXT WEEK!! May 2nd – May 6th 2016
We have LOTS and LOTS OF IDEAS!!
CLICK HERE for all our many teacher appreciation ideas!!
If you can read this post THANK A TEACHER!!
![]()
Don’t forget teacher appreciation week is NEXT WEEK!! May 2nd – May 6th 2016
We have LOTS and LOTS OF IDEAS!!
If you can read this post THANK A TEACHER!!
My daughter had a somewhat interesting request for her birthday theme this year. She loves Taylor Swift but about as equally she loves her 2 cats. (SHE LOVES CATS!!) Her cats are scottish fold and she named them Meredith Grey and Olivia Benson. My daughter just LOVES THAT!! She wanted to incorporate the two together. She loves to sing just like Taylor Swift and so I was on a mission to make this happen 🙂 I hit up the Dollar Tree for alot of this party.
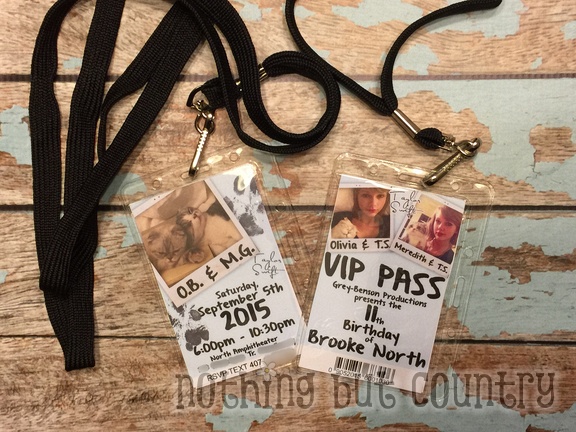
Her invivations looked like Concert lanyards. Found lanyards super cheap on Amazon Prime. — Here is a link to the lanyards I found. Still cheaper than paying 1.00 each at Walmart. Ill have extras saved for another project I am sure. They were a hit. Such a fun invitation 🙂
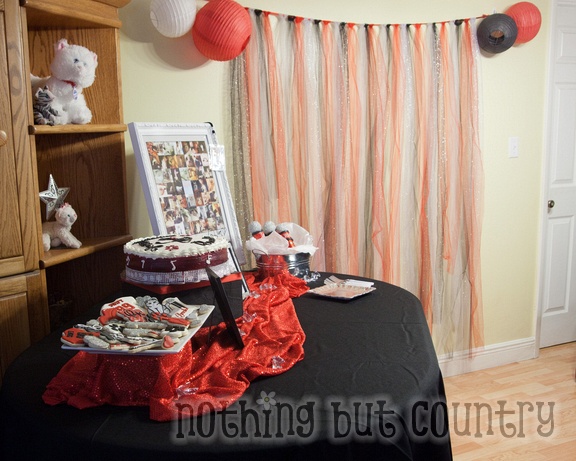
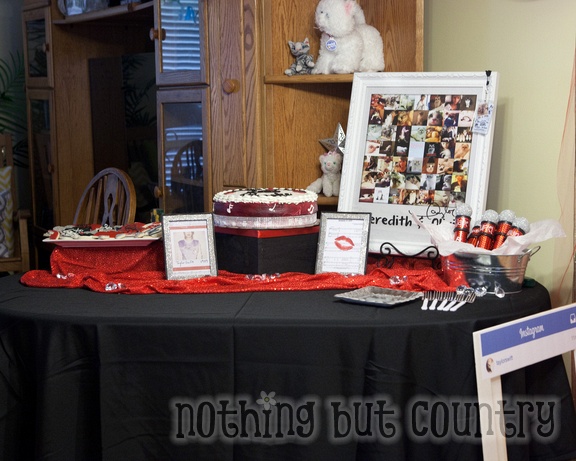
We set up a few tables. I do want to say in my past life- I was a graphic designer in college. So Alot of decorations happened because I personally designed them. Just in case anyone was curious where I got some of the items. You won’t find them online- they were just created by me 🙂 But I will link you to other items to help you that I did find online.
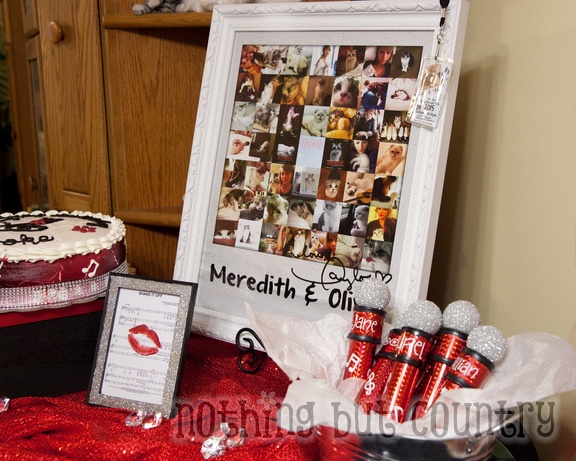
I designed a Meredith and Olivia poster. Found 49 photos of Taylor Swift with either of her cats on instagram or google or even youtube videos that I took still screen shots off my phone to have enough photos to make this poster of her cats. I then incorporated Taylors signature and made a “Polaroid type” poster to coincide with her 1989 album. Printed it 16×20 at my local Sams club. Framed it with a 50% off frame from Hobby Lobby. This will also serve as a gift for my daughters bedroom to hang up after the party.
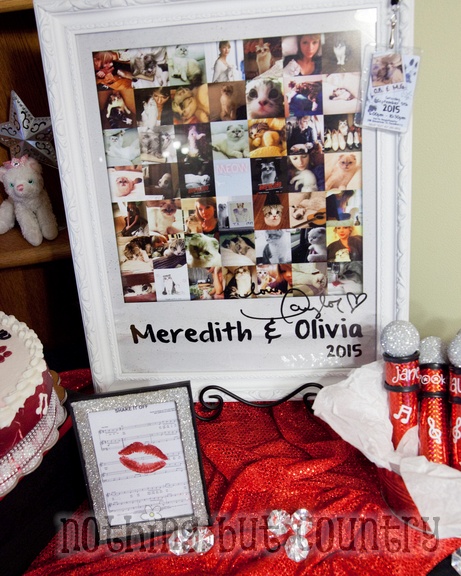
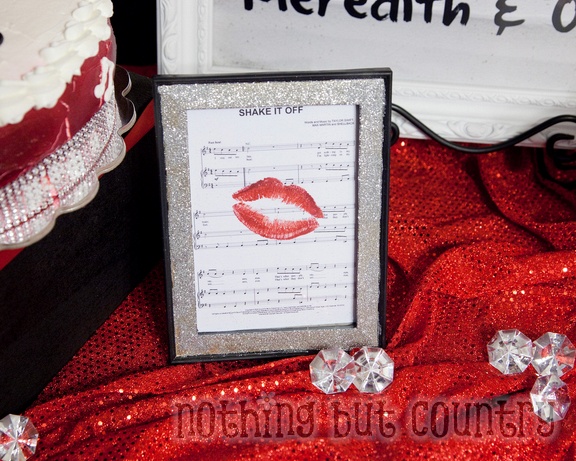
Frames were from the Dollar Tree. I will share further down in this post how I made them. Found sheet music on Google images and photoshopped lips onto the sheet music and printed 5×7 to frame.
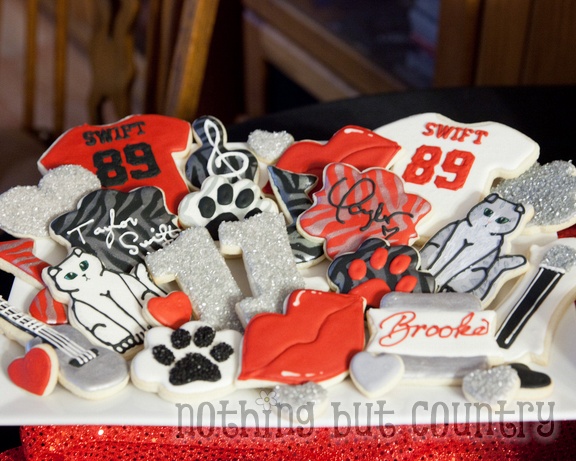
Created a fun set of sugar cookies for the party as well. 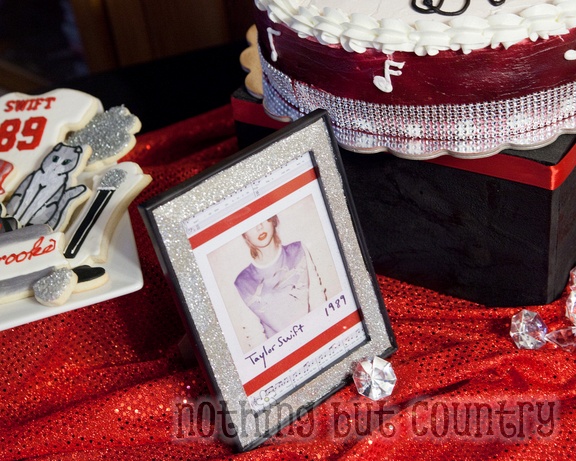
Another dollar tree frame with a print I created in Photoshop.
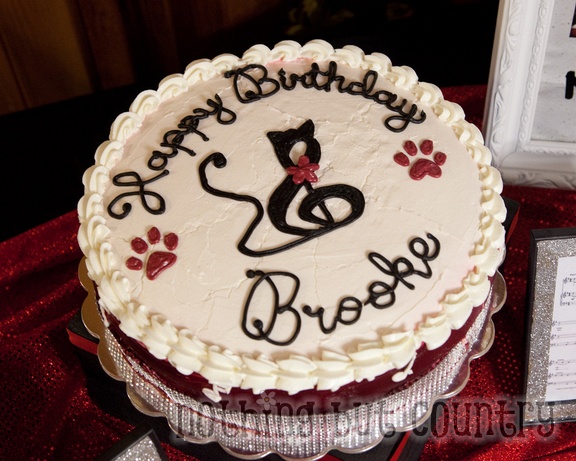
This cake I also made. My daughter found the cat treble cleft image on Pinterest and asked that to be on her birthday cake. It seemed fitting 🙂
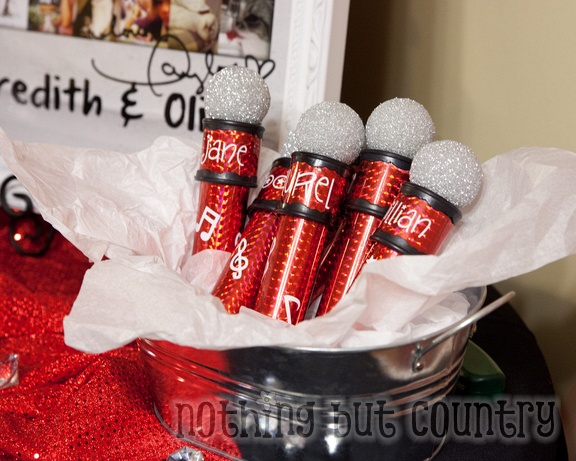
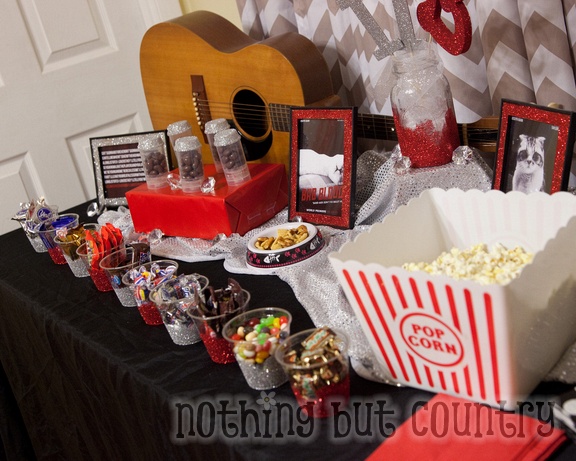
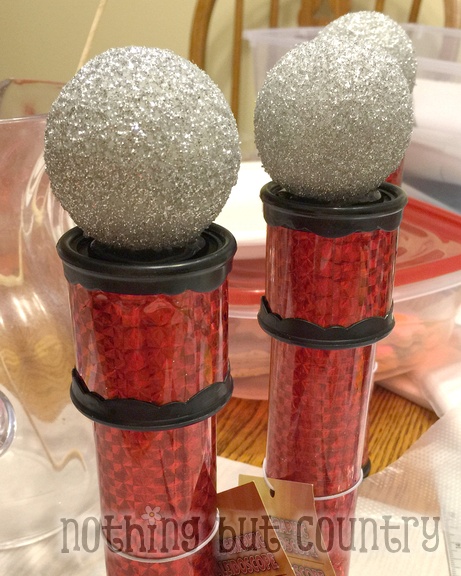
These microphones were a blast! I can’t take credit for this. My girlfriend linked me to a blog and I LOVED THEM!! Check it out!! MARCI COOMBS BLOG I was so excited to find the styrofoam balls and other parts at Dollar Tree 🙂
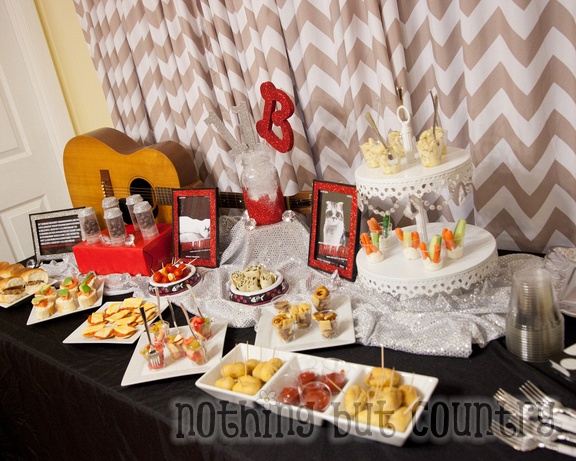
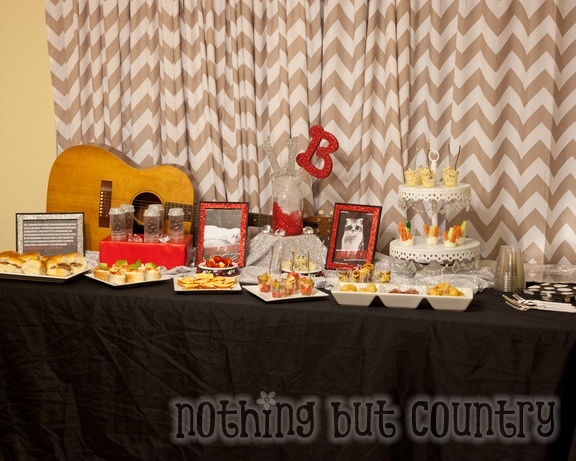
Food table was fun as well. More frames and my daughter wanted “Little fancy food” for dinner with her friends. 🙂 Sounds easy enough!!
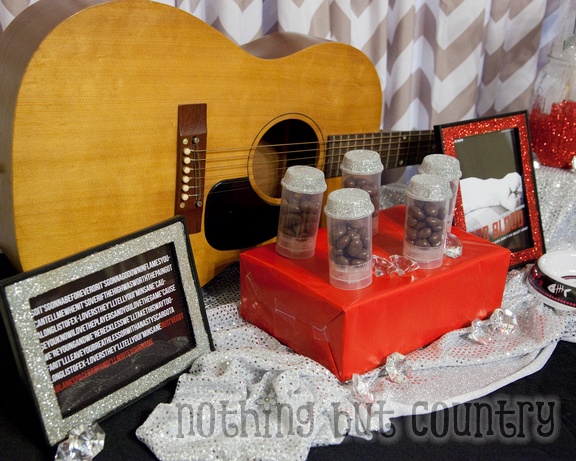
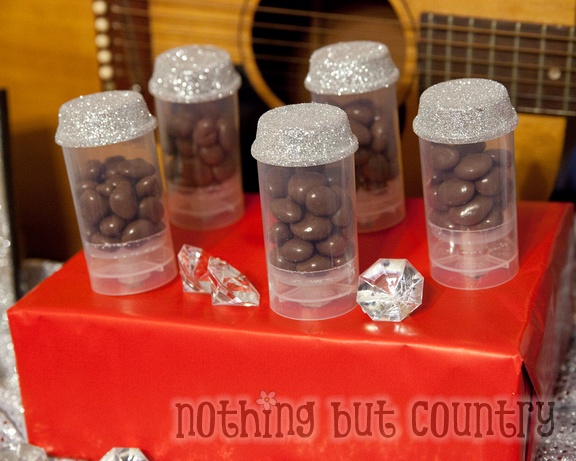
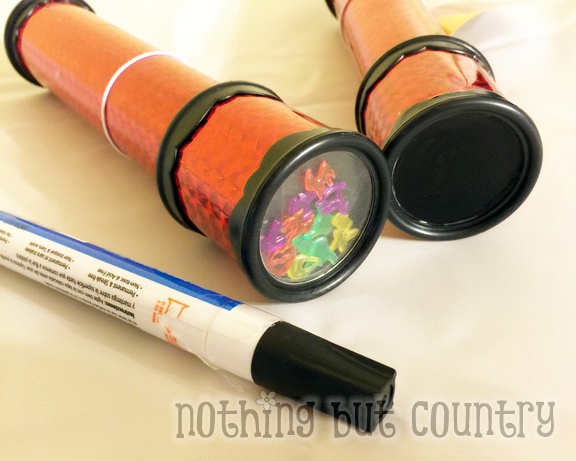
Push pop containers that we glittered the tops and filled with chocolate raisins to look also like micorphones. Used a shoe box covered in red paper to stand them up.

Image for this frame came from Google Images 🙂
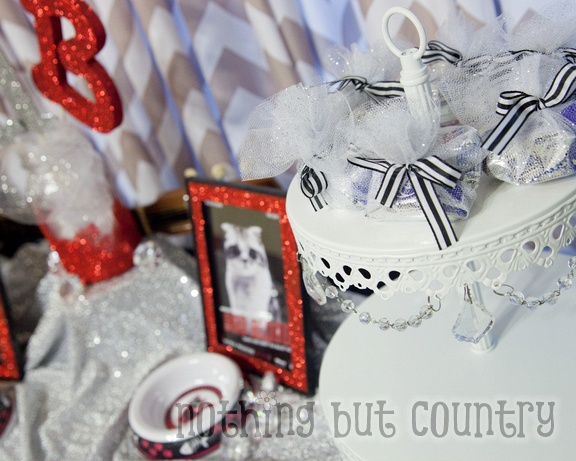
Candies wrapped in netting from the wedding section with left over ribbon I had from a prior party.
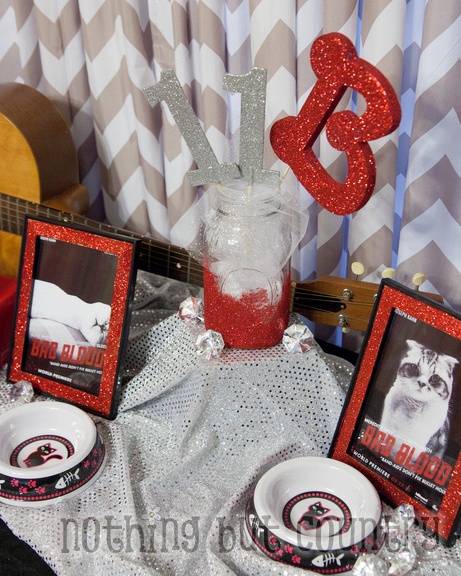
Glittered a canning jar I had on hand, glittered a foam B my daughter already owned, and found the numbers at Hobby Lobby 🙂 Cat bowls came from Dollar Tree.
Oh — the glittery fabrics– also Hobby Lobby. Used 40% off coupons and had them cut me 1 1/2 yards or silver or red just to drape on the tables. I bring my kids with me when I go so they can “check out” and use a coupon too if I have more than 1 item needing to use a coupon on.
The big diamonds– wedding section of Hobby Lobby. Another coupon used 🙂
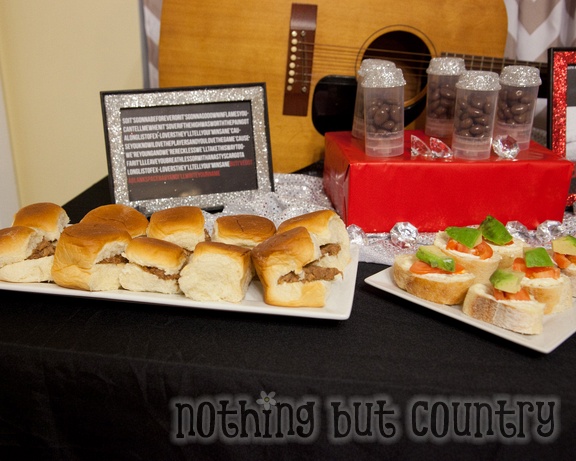
Foods included – pulled pork in Hawaiian rolls 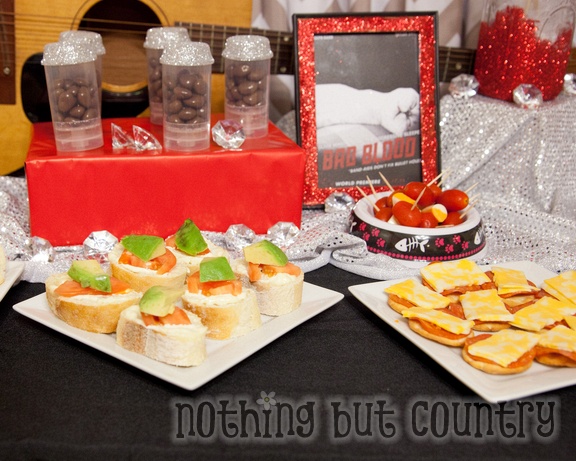
bread with garlic aioli, tomato/avacado. (yeah girls didnt care much for that– so the adults ate it ahah) Crackers with cheese and pepperoni (reminded them of pizza)
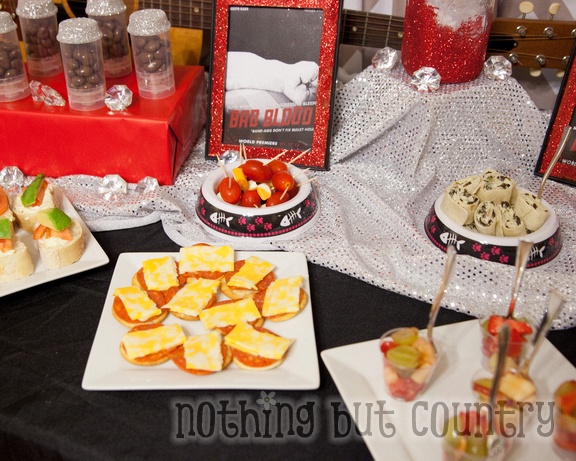
Tomatoe and cheese on tooth picks (yeah another non winner with girls hahaha hey I was trying to serve healthy too!!) The other cat bowl was just a tortilla with spinach dip smeared in it, rolled up and cut. They did like that. Fruit salad they did like that.
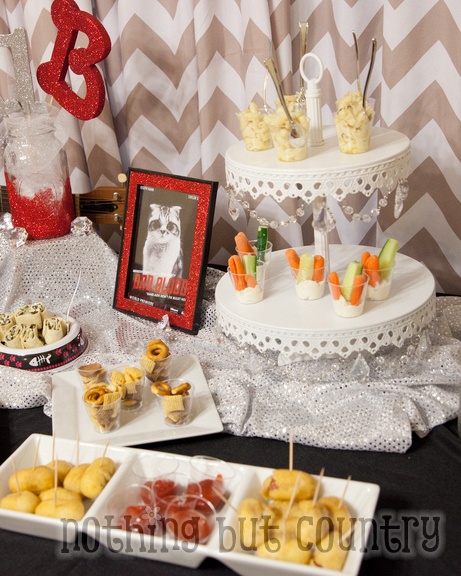
The little mini cups with the mini spoons or forks- Dollar Tree wedding section.
In some of the cups- carrot/cucumber sticks (Again– I lose– they didnt want that HAHAH the veggies didn’t really go over well live and learn) The top tier was mac and cheese (of course well received!!)
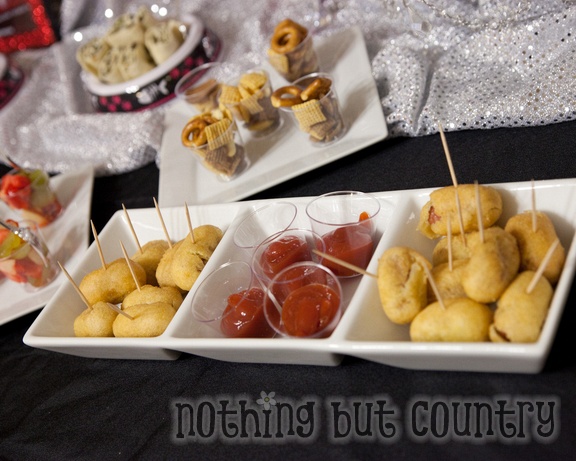
Corn doggies and personal cups of ketchup. Those went. Also Chex Mix– another winner in a cup LOL (basically junk food) LOL

They loved having all the “little” portions. They felt fancy. Picked up silver plates from Hobby Lobby and fancy silver colored forks too. They thought it was real silver ware. They were confused when I threw their forks away they thought I was to keep them to wash. HAHA CUTE!!
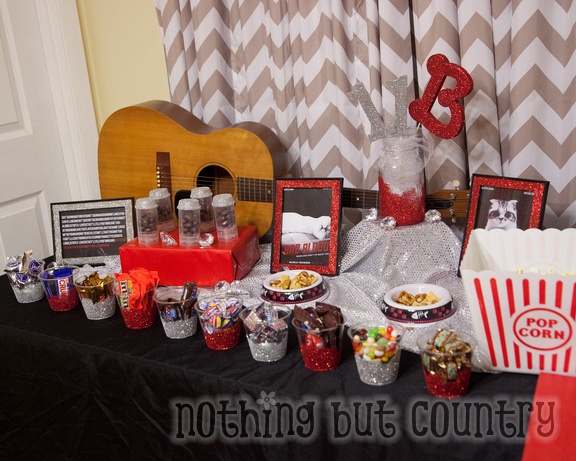
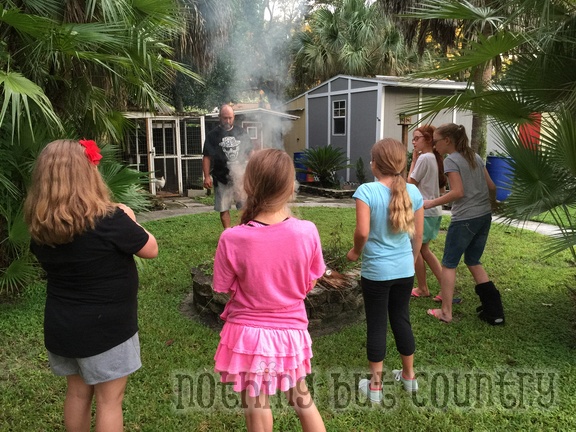
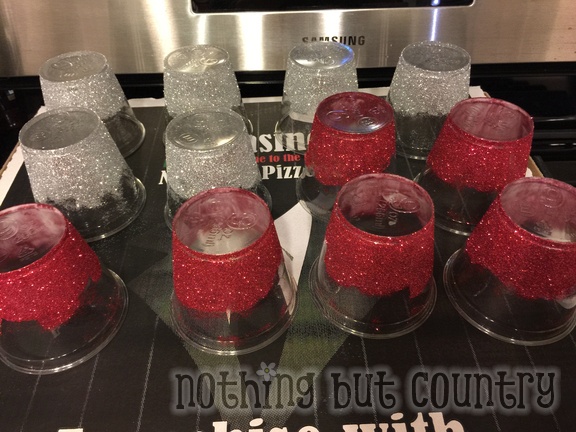
Later on in the party after the girls played outside, did a bond fire, we were to have an outside movie but thanks to Florida weather it stormed so we came inside– piled lots of blankets and pillows and watched a movie inside. So we set up the candy/pop corn station. I simply glittered the bottoms of plastic cups. All candy either I had or dollar tree. Pop corn bucket also I had (got from dollar tree years ago) Had red paper bags and allowed them to make a bag of treats to eat during the movie. 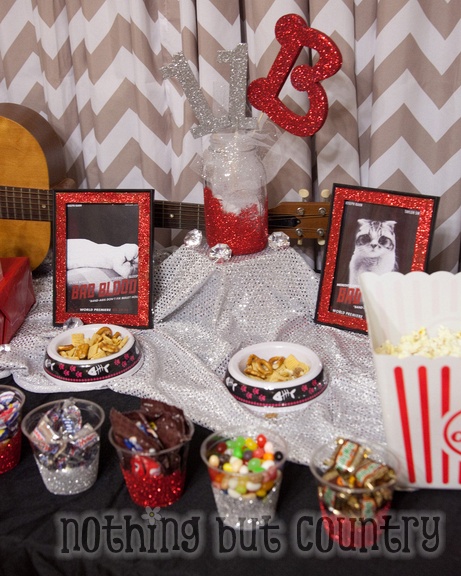
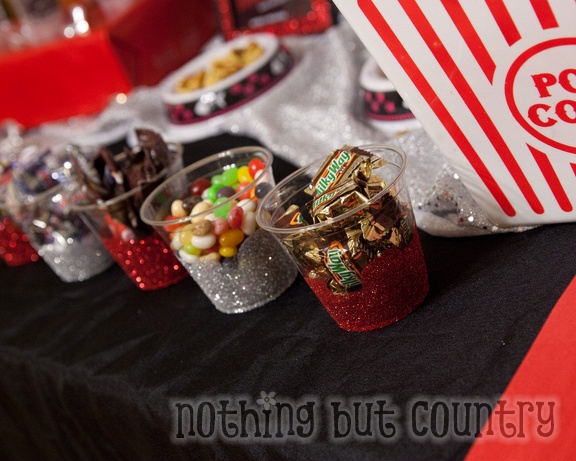
Easy- plastic cups I already owned and glue and glitter went a long way 🙂 Very fun and inexpensive and made a statement.
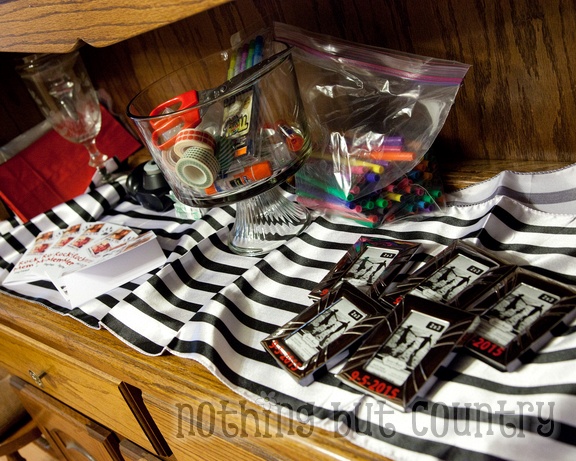
We made scrap books from all the things we did. 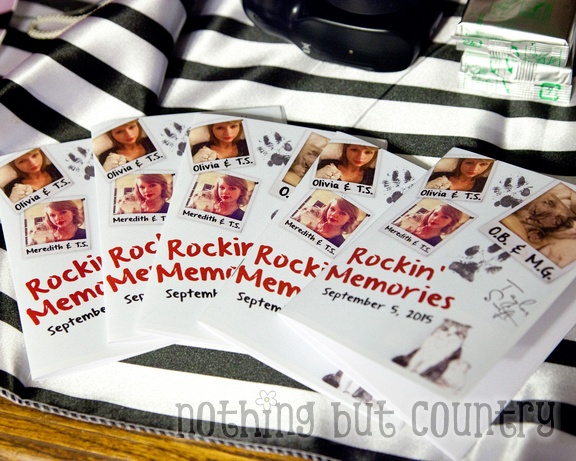
I created this file for the scrap books, and included blank paper inside (computer paper) They each got one.
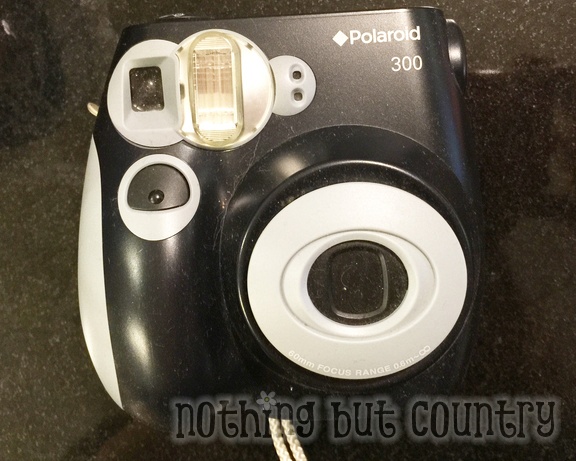
My sister loaned me her Polaroid 300 camera. VERY COOL!! It printed off cute 2×3 photos instantly of the girls. So if we did any group shots, we took it 5 times for each of them to get one. But they LOVED watching them develop. Sersiously they were MESMERIZED watching them show up and getting all excited. HAHA I love this camera SO MUCH I think I am going to have to get myself one. Here is the one we used on Amazon
Picked up extra film as well for it. – FILM ON AMAZON
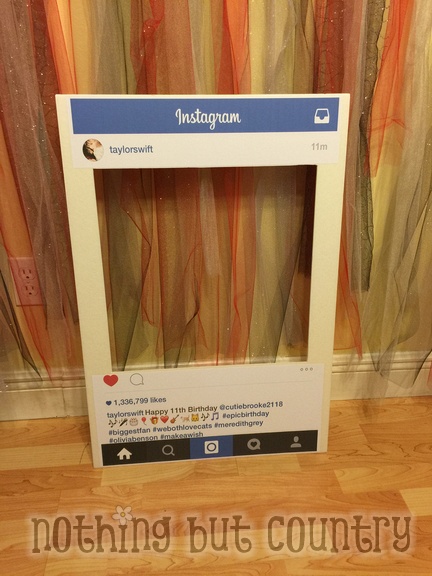
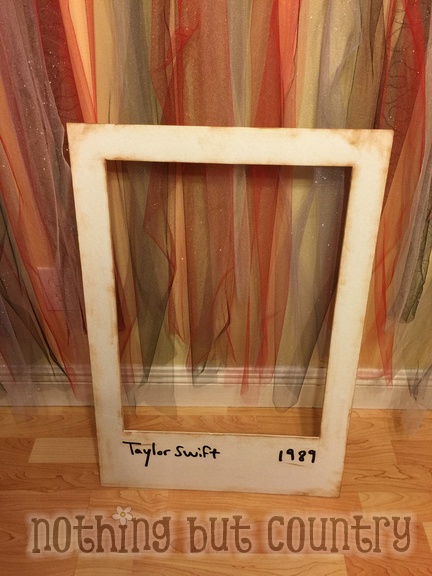
Made these fun photo props. Foam Boards came from Dollar Tree. 🙂 The polaroid one simply used brown paint and dry brushed the edge. Used my Vinyl cutting machine and cut out the words for it. 🙂
The instagram one- same board, however designed it in Photoshop and used a large scale ink jet printer I have and printed it and glued it to that board. The girls loved reading thinking it was a real Taylor Swift instagram shot. 🙂

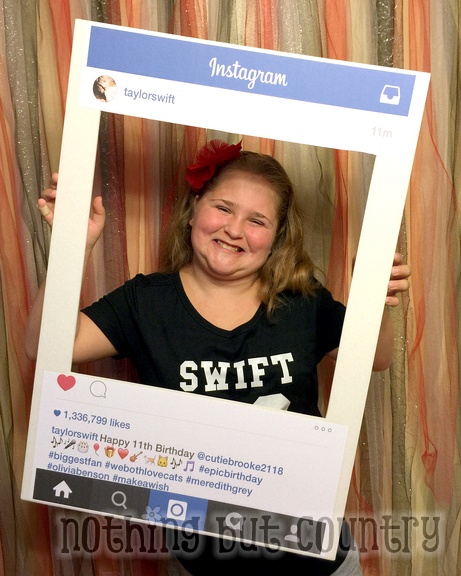
My kids goofing around with the boards before the prty. The back ground is tulle ribbon from Hobby Lobby just tied on to a ribbon for photos/decorations 🙂
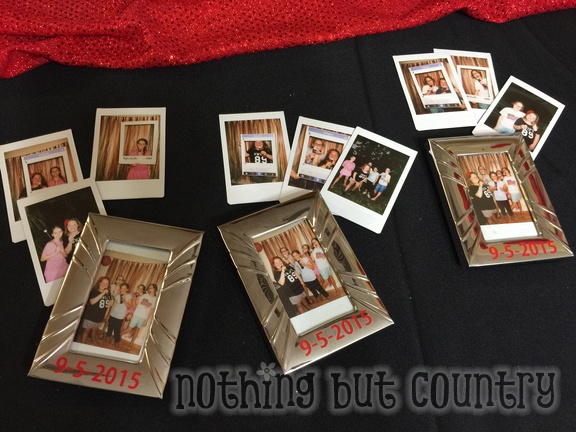
As we took photos of the girls we kept each girl their own pile so when it came time to designing their scrapbooks- they knew which pile was theirs. The 1 group shot- I put them in cute 1.00 2×3 frames (also from dollar tree) I added the date in vinyl as well. Put them in their goodie bags so they took them home. They each ended up with 5 photos (1 frames and 4 for their scrap book) I provided them washi tape, glue, markers and they had a great time making scrap books with their photos. Keeping the polaroid theme going like the new album 🙂 Lots of fun. Used the microphones also for props. They even in some of them used the diamonds on the table for props. They got super creative and were a blast!! They loved feeling like movie stars.
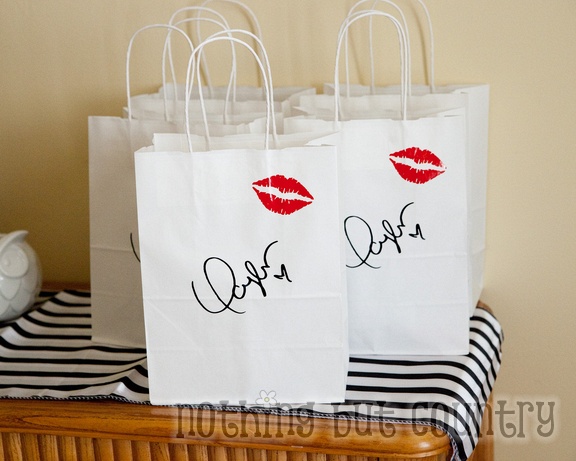
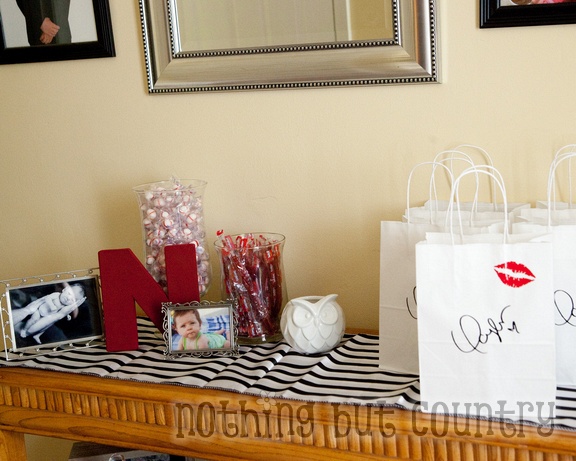
Goodie bags- white bags from Dollar tree. All graphics on them are done in my silhouette vinyl cutter and added to the bag. The backs of the bags had the girls name on it so I knew who’s bag was who as they added things to it (when they finished scrap books we could put them in the bags etc)
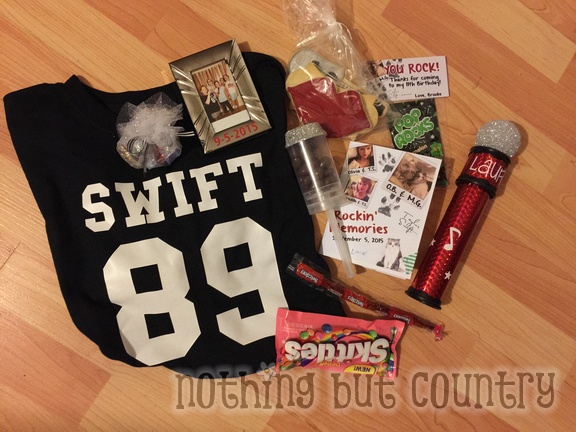
Inside the bags- we made each of the girls a Swift 89 shirt, candy, frame, they picked out sugar cookies from the table to take home and other fun things. Often times the bag just evolves. I do so many parties and activities I often have left over items and I just keep reusing. I already had pop rocks and bags of skittles and push pops I have had those containers easily 5 years and still using them up. So I never know what goes into a goodie bag right away till I just go thru what I already own or have from other projects.
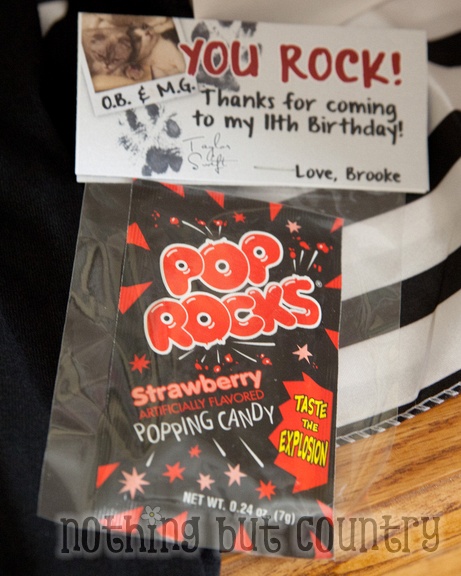
Since I had exactly 5 packs of Pop rocks (and 5 girls) Made tags in photo shop and did a play on words as a thank you. Since we were on the “ROCK THEME” in this party.
Alot of the striped table runners– again– I just happen to own from other events I have thrown. I am always throwing parties of some sort and I organize all my items and keep fabric scraps etc– and seriously the day of the Party I just go through what I have and pull out colors that I own and just build the party up as I go along. Just something I enjoy 🙂
As promised here are some photos on how I made some of the items. These photos are not very desirable. I am sorry. Taken on my iphone “in real life” Just snapping photos as I made them. So they are not as pretty of photos but does the job to share with you.
Just as the other blog I linked above- I took kaleidoscopes and used an opaque paint marker and painted the tops black.
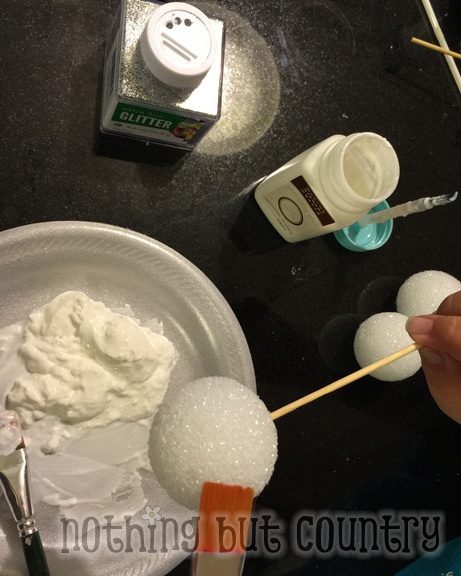
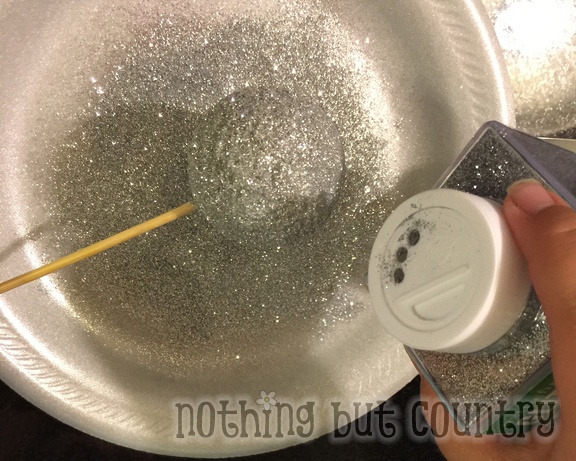
Using Martha Stewart Glittering Glue and Glitter- I stuck the Styrofoam balls on a skewer and brushed on glue and silver glitter.
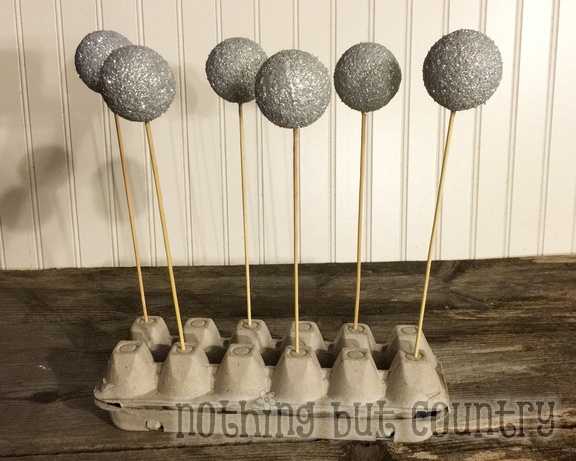
Flipped over an egg carton and stuck them in the carton to allow them to dry. I then glued the Styrofoam balls to the end of the kaleidoscope and used vinyl to decorate it with their names and music notes.
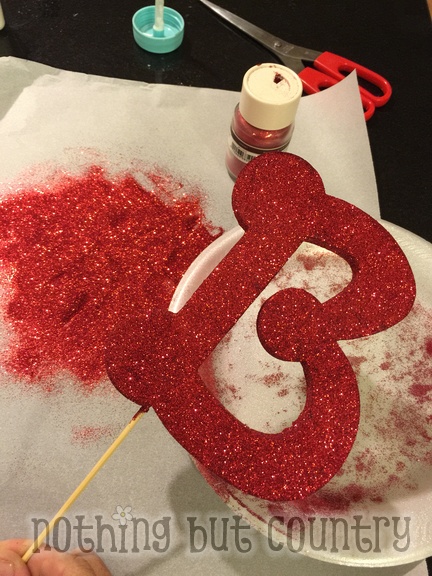
Since we had the glitter out– we went to town. My daughter had this foam B (it was glue) We glued and glittered it on a skewer as well.
Glittered lots of plastic cups 🙂

These frames came from the dollar tree. As photographed- we glued on the brown part of the frame then glittered them.

Simple and was fun. GLITTER EVERYWHERE of course– but it didn’t take us long to do these and made everything look so fun!! I haven’t done alot of glittering in the past– but I enjoyed it. All the bling– and I walked around for days with glitter. Even a shower didn’t get it off all the time. I am still finding a little glitter in the house. But– seriously there are worse things– glitter isn’t one of them HAHAH
So there you have it. I know alot of photos 🙂 It was a fun party!! I love love doing this. OHHH– and for the record– My daughter has NEVER been to a Taylor Swift concert. Just loves to blast her music. However– she did open a gift that contained 2 tickets to the Tampa, FL concert in October. She was beside herself. It was a long 10 months of keeping a secret since we got the tickets LAST year. She is looking forward to seeing Taylor Swift next month (on halloween)
And I must admit– I LOVEEEE Taylor Swift too– so this party I kind of enjoyed it for myself HAHAH Still a kid at heart!!!
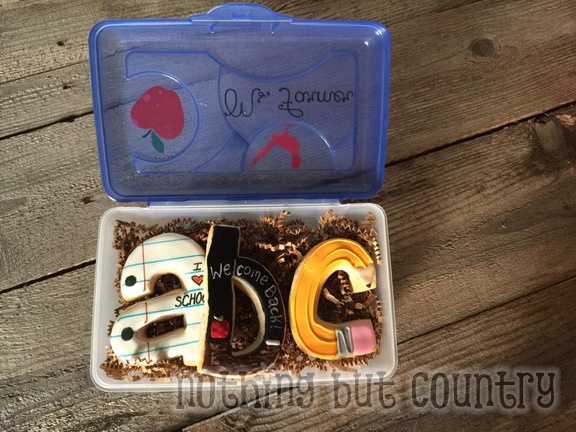
My daughter took these to her teachers this week as a welcome back gift. Decided to bake up some sugar cookies and added them to a pencil box 🙂
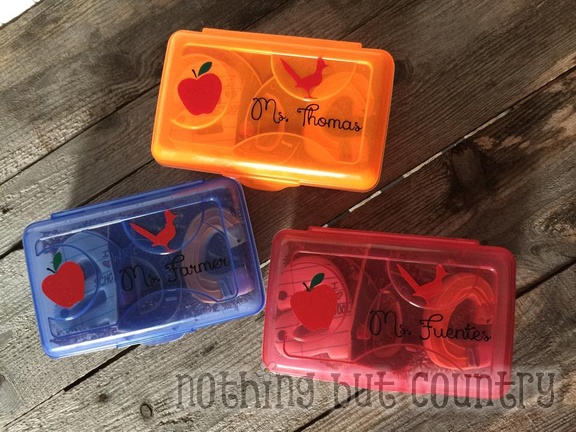
I used my silhouette machine to cut out vinyl to add to the outside of the pencil boxes that I picked up at my local store that sells school supplies. They fit perfectly. She was so excited to take them to school.
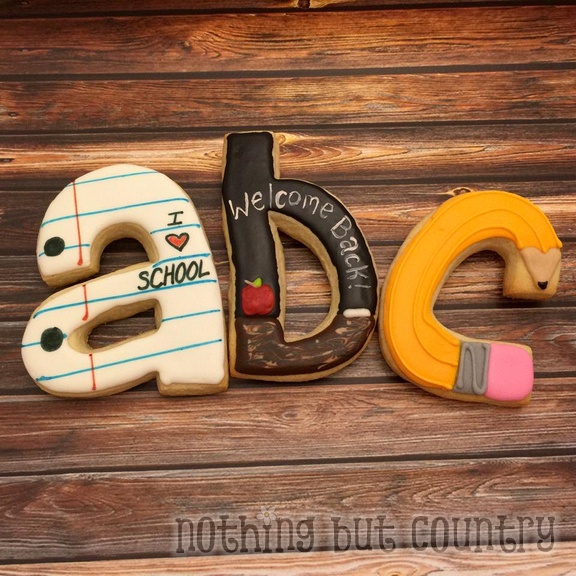
If you aren’t into decorating cookies you can send in chocolate chip cookies or any type of cookies you would like to bake into a pencil box. 🙂
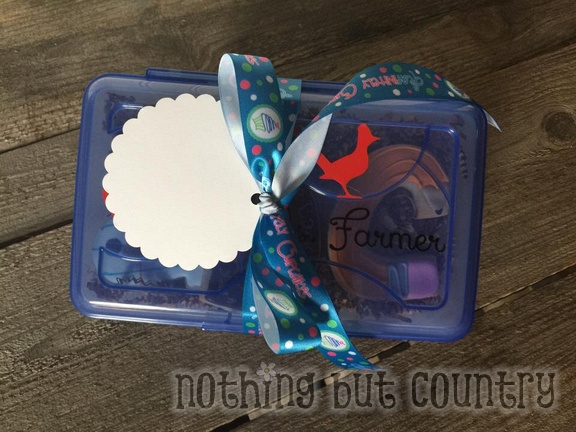
Tied it with ribbon and added a card my daughter signed . Was a cute gift letting the teachers know we were looking forward to SWEET year with them 🙂
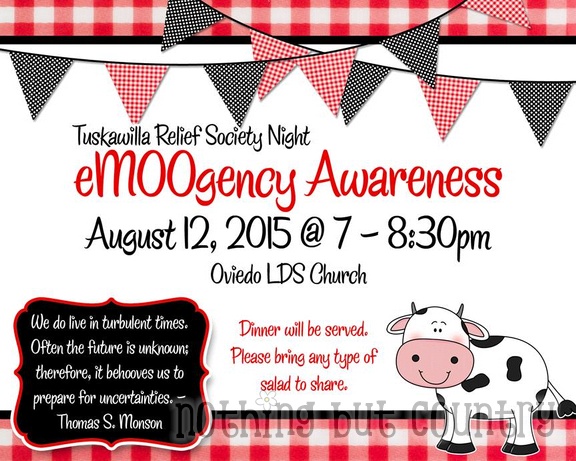
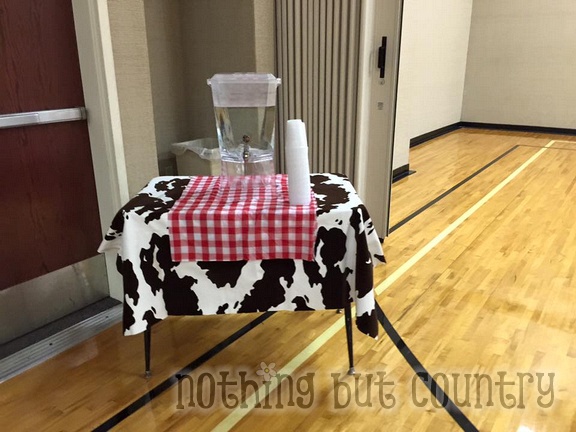
We had a fun Relief Society Night. Cow themed and mini classes on emergency preparedness and awareness. It was a fun night!
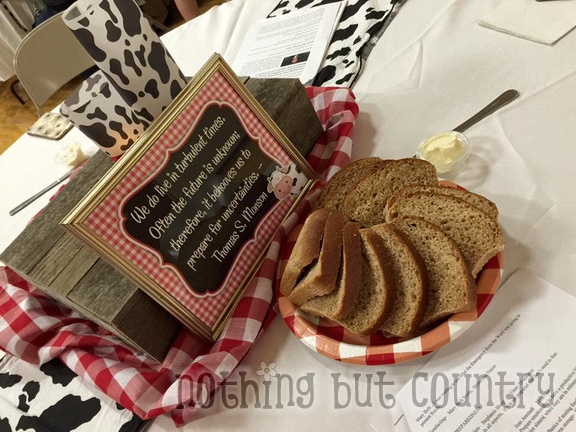
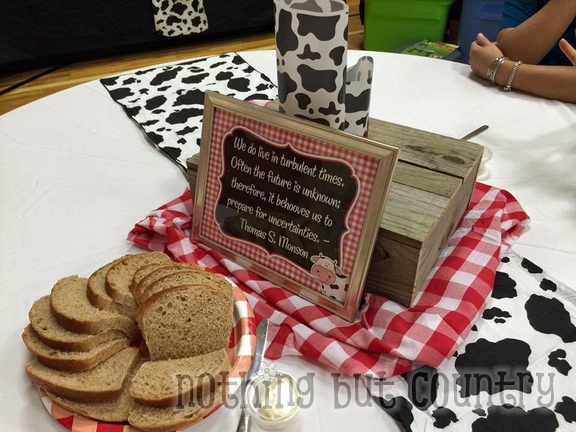
Tables were set with fresh bread that was later one of our mini classes on making your own bread. YUMMMYYY
Found the checkered plates and napkins at walmart recently on clearance!! Seriously .40 !!! PERFECT TIMING!!
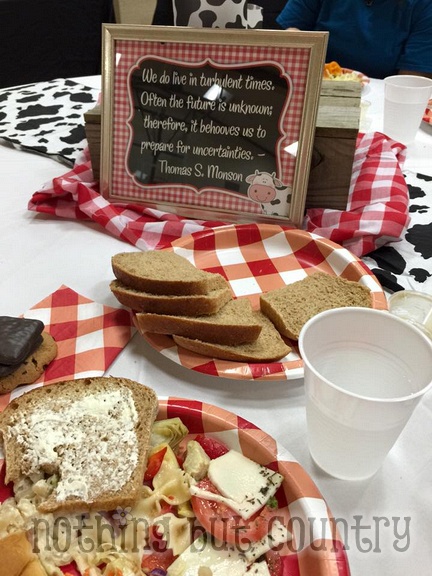
Frames came from the Dollar Tree and we use it often for relief society nights and trade out the print. 🙂
Laterns were just velum printed cow print and a battery operated tea light inside 🙂
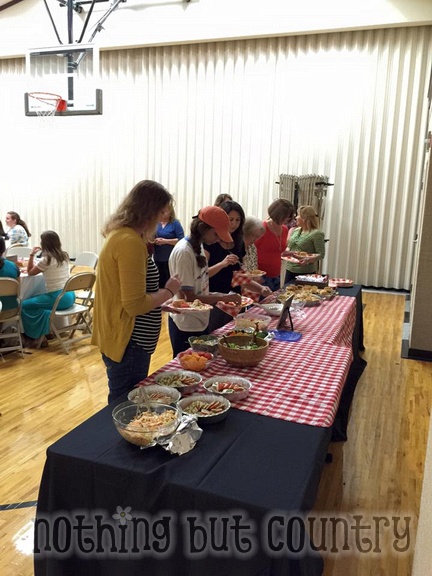
Dinner everyone brought their favorite salad (veggie, pasta or fruit) We provided pulled pork bbq inside rolls for the dinner portion. It was fun!!
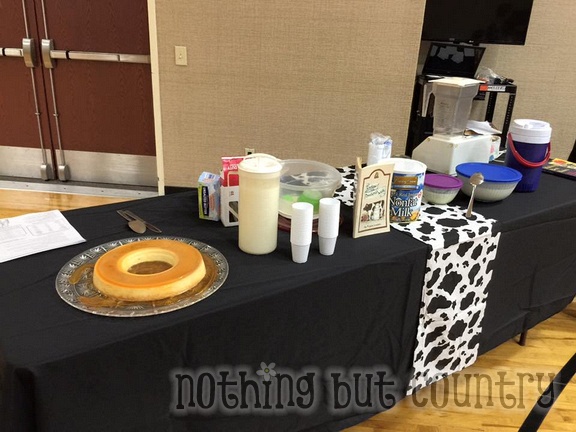
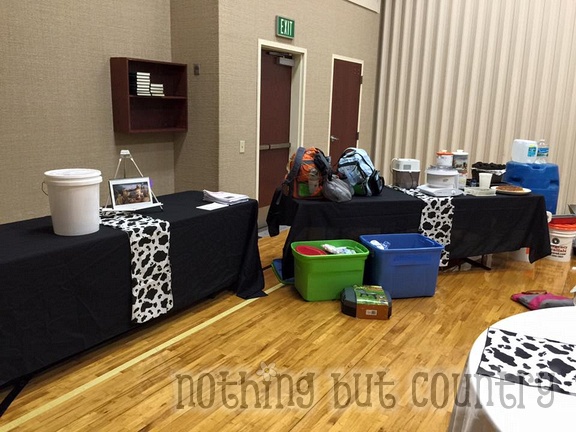
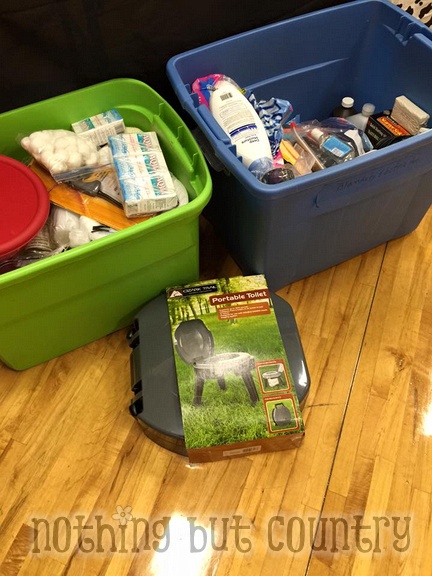
We had all the classes set up and covered from yogurt making, bread making, personal preparedness, 72 hour kit, water storage, food storage etc. It was a great night. We gave out hand outs on 72 hour kits, and bread recipe , yogurt recipes etc everyone could take home. 🙂
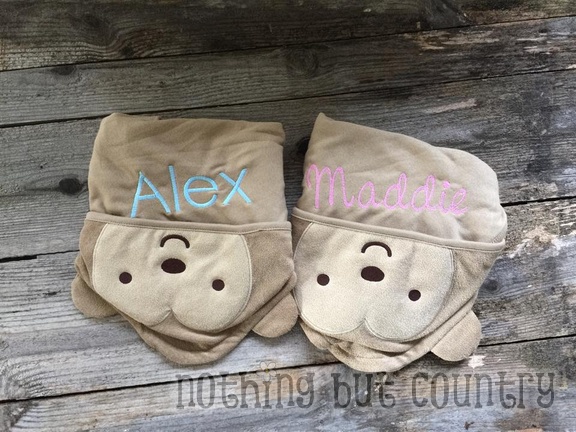
I love to embroider anything that doesn’t move!! When I was invited to one of my girlfriend’s baby shower for her new little ones– I had to add their names to these adorable bear towels. 🙂 CUTE CUTE!!! Easy gift but personalized makes it extra special.
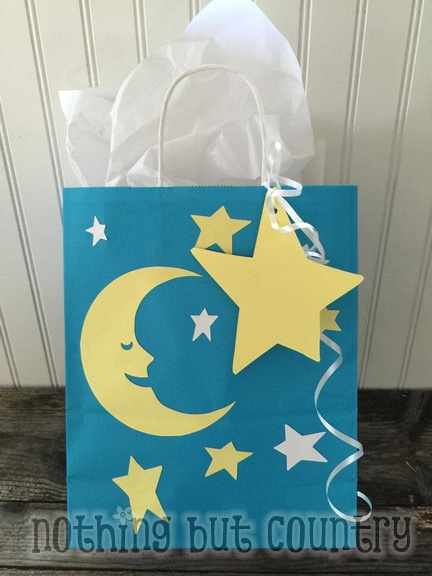
If you haven’t realized from my blog already I love my silhouette machine!! I use it for so many projects. One shower I attended the theme was “OVER THE MOON” and I decided to cut out a moon and stars to glue on to a bag to match the theme. I love how it turned out!!
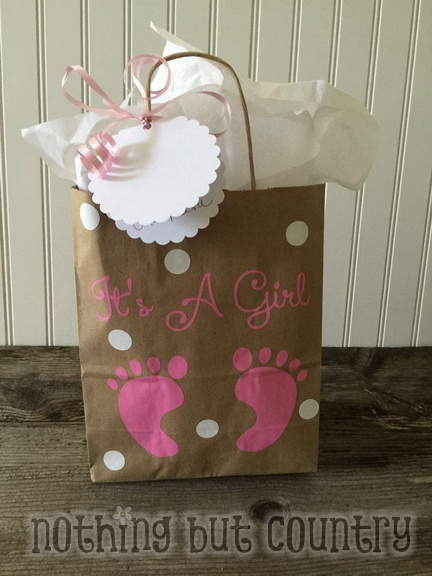
This bag the shower didn’t particularly have a theme other than it was for a cute little baby girl on the way. I love to pick up thee Kraft bags at the dollar tree. You get 2 for a dollar. I dressed it up with pink and white vinyl. 🙂 Easy peasy and personalized by me 🙂 I love my silhouette machine!!

Did you know every year Chick-Fil-A has a cow appreciation day? This is the one day my family goes out, dresses up and enjoys a yummy meal at Chick-Fil-A. It is awesome. We go around 1130am to beat the lunch rush because it is such a popular day. We get a yummy free meal. We…
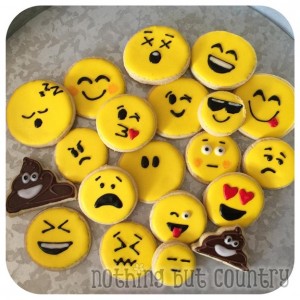
I am SOOO addicted to emojis on my iphone . I use them ALLL THE TIME. Even in my blogging I have emoticons in them 🙂 I was hosting a party at my home. No real theme per say but all my girlfriends love to text and social media and I knew these cookies would…
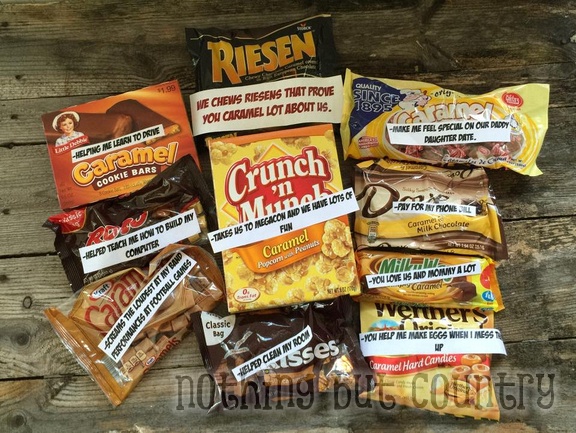
My husband LOVE Caramel!!! SERIOUSLY LOVES IT!!! We hit the stores and found everything in Caramel. WE did a play on words using the foods- WE CHEWS RIESENS THAT PROVE YOU CARAMEL LOT ABOUT US. I then had the kidlets tell me all the things that dad does for them that proves he loves our…
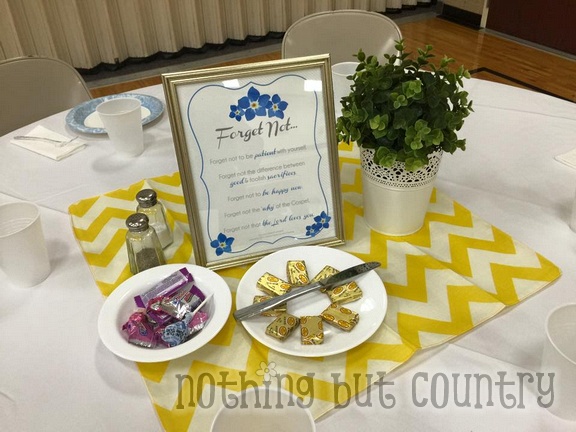
This was another fun Relief Society Night. Forget Not. We had 3 classes that would feed us – SPIRITUALLY, PHYSICALLY & EMOTIONALLY Frames that we got at the Dollar Tree and printed off a scripture / quote to go inside them. I enjoy chalk art- my husband made me some time ago large chalk boards…
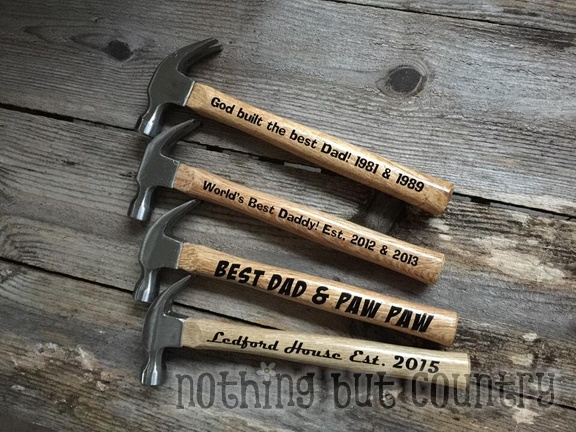
We had alot of fun making these hammers for many special dad’s this coming Father’s day! If you own a silhouette you can do this too. We simply used Vinyl and got a really fabulous hammer from your local building supply store. We customized each hammer as our friends requested. I thought I would share…
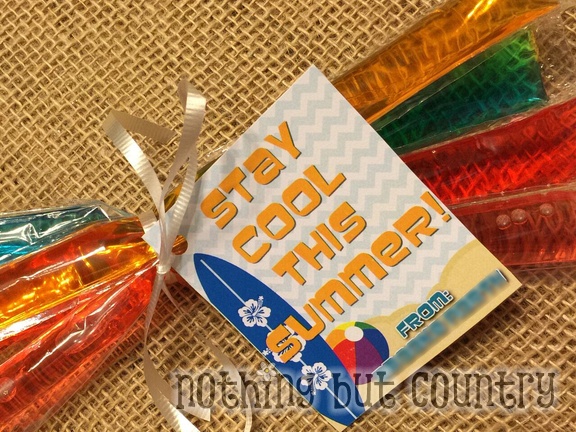
Love pinterest. I saw this idea multiple times from various blogs and wanted to do the same!! This box of 100 pop-ice was only $3.77 at my local Walmart. Makes for a very cheap gift for over 20+ students. I am room mom for my daughters class and their end of the year party is…
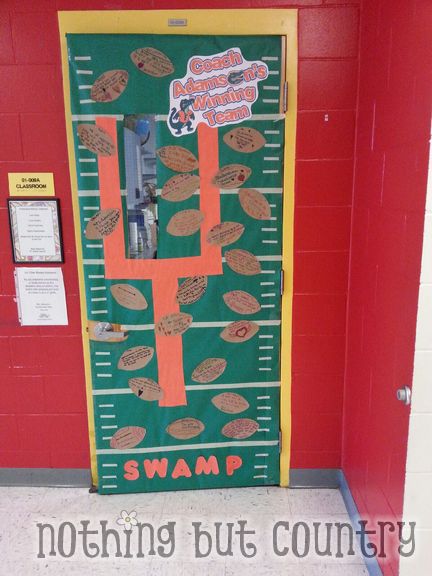
I am one of the Room Moms for my daughters school. Friday Me and another room mom (I am blessed this year there is more than 1 of us!! LOVE THAT) We got a head start and worked on the door for our wonderful teacher. She obviously is a Gator Fan and SO…
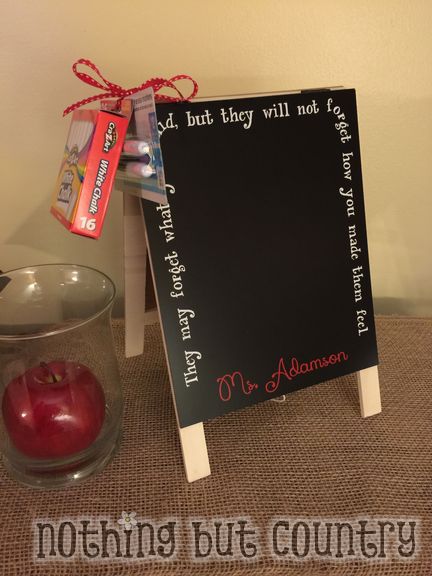
Found these cutest Chalkboard / Dry Erase Board Easel in the Dollar Spot of Target. They are priced at $3.00 but they were still an awesome price and very cute. I knew with a little vinyl I could make them look even more fun for a teacher. I added a quote and her name on…
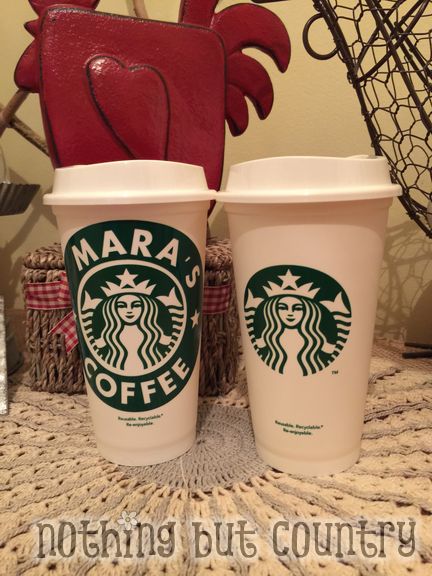
I have used this quote a few times over the years– CLICK HERE TO SEE THE OTHER THANKS A LATTE GIFTS This year I have taken the reusable cup that Starbucks sells for 1.00 and used my trusty Silhouette Machine. Cut out with Forest Green Vinyl and added just the ring around the outside of…
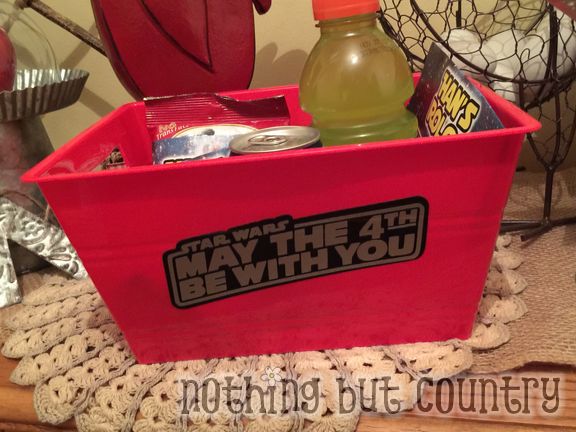
This year Teacher Appreciation falls on May the 4th. We love Star Wars in this house and so I felt it would be fun to make a gift to go along with the day 🙂 I got this red tub from Dollar Tree. I used silver and black vinyl with my awesome Silhouette Machine. I…
 Both deaf since the age of 3, Chad and Mary Beth enjoy not only raising their little family but photographing together, cooking & crafting as well. Living in Central Florida with their ...
Read More About Us »
Both deaf since the age of 3, Chad and Mary Beth enjoy not only raising their little family but photographing together, cooking & crafting as well. Living in Central Florida with their ...
Read More About Us »


|
|
 |
 |
 |
 |
 |
 |
 |
 |
 |
 |
 |
 |
|
 |
 |
 |
 |
 |
 |
 |
 |
 |
 |
|
 |
 |
 |
 |
 |
 |
 |
 |
 |
 |
 |
 |
|
|
|
|
|
 |
|
|
 |
 |
 |
 |
 |
|
|
 |
 |
 |
 |
|
 |
 |

Powered by WordPress and Headway - Copyright © 2025 Nothing But Country | Contact Us | Disclosure Policy | Sitemap


